

How To Create A Partition With Diskpart


Creating Disks and Volumes Using the DiskPart Command
The following examples show how to create basic and dynamic disks using the DiskPart command.
- Example 1: Creating basic disks using the DiskPart command.
- Select a disk, whether it is Raw or dynamic disk, and convert it to basic storage type.
X:\windows\system32\DR>diskpart
Display existing disks.
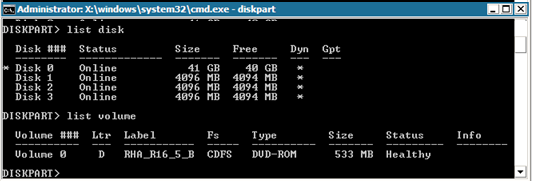
DISKPART>list disk
DISKPART>list volume
Create the boot and system volume on disk 0
DISKPART>select disk 0
(Optional) Convert to GPT style, if needed
DISKPART>convert gpt
- Create basic volumes for the System and Boot volume.
Create System volume
DISKPART>create partition primary size=100
Create Boot volume
DISKPART>create partition primary
DISKPART> list volume
- Mark system partition as active.
DISKPART>list partition
DISKPART>select partition 1
DISKPART>active
Check the status of the system volume.
DISKPART> detail partition.
Note: Use active command only for the system partition.
- (Optional) Assign the volume a drive letter and format it.
DISKPART>list volume
DISKPART>select volume 2
DISKPART>assign letter=C
DISKPART>format quick
- Example 2: Creating a System and a Boot dynamic volume using the DiskPart command.
- Select a disk, whether it is Raw or Basic disk, and convert it to a dynamic storage type.
X:\windows\system32\DR>diskpart
Display existing disks.
DISKPART>list disk
DISKPART>list volume
Create the boot and system volume on disk 0.
DISKPART>select disk 0
(Optional) Convert to GPT style if needed.
DISKPART>convert gpt
DISKPART>convert dynamic
- Create simple dynamic volumes for the System and Boot volume.
Create a system volume.
DISKPART>create volume simple size=100
Create a boot volume.
DISKPART> create volume simple
Display created volumes.
DISKPART> list volume
Prepare volume 0 as the system volume.
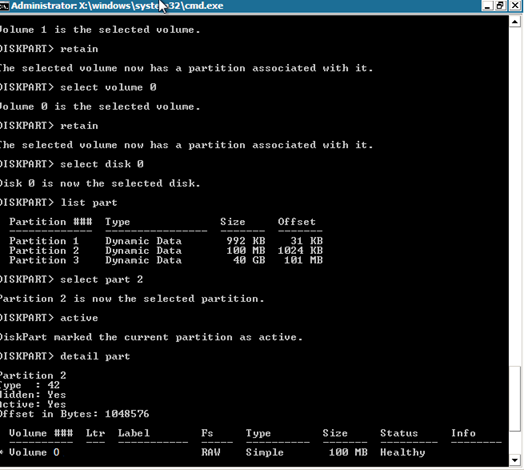
DISKPART>select volume 0
DISKPART>retain
Prepare volume 1 as the boot volume.
DISKPART>select volume 1
DISKPART>retain
DISKPART> select disk 0
- (Optional) Mark the system partition as active.
Display partitions.
DISKPART>list partition
DISKPART>select partition 2
DISKPART>active
Check the status of the system volume.
DISKPART> detail partition
- (Optional) Assign the volume to a drive letter and format it.
DISKPART>list volume
DISKPART>select volume 1
DISKPART>assign letter=C
X:\windows\system32\DR>format C: /q
Note: If you created a UEFI System partition, format it to a FAT32 file system before you can restore data. You do not need to run the retain command.
- Example 3: Creating a non-system/boot disk volume using the DiskPart command.
- Select disks and convert to a Dynamic storage type.
X:\windows\system32\DR>diskpart
Display current disks and volumes.
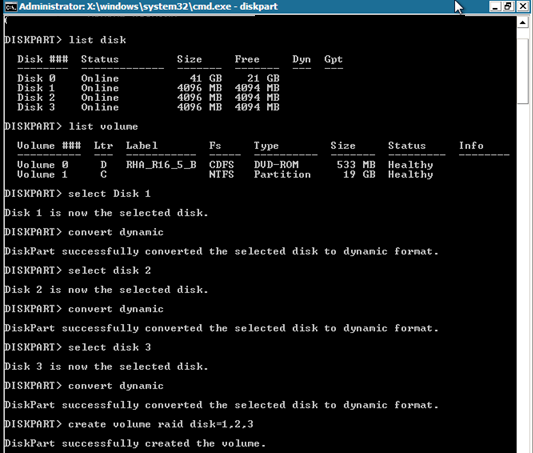
DISKPART>list disk
DISKPART>list volume
Convert each disk except Disk 0 to dynamic disks.
DISKPART>select disk 1
DISKPART>convert dynamic
DISKPART>select disk 2
DISKPART>convert dynamic
DISKPART>select disk 3
DISKPART>convert dynamic
- Create RAID-5 volumes on each disk. Similarly, you can create simple, stripe, or other dynamic disk types.
create volume raid disk=1,2,3
- (Optional) Assign the volume to a drive letter and format it.
DISKPART>list volume
DISKPART>assign letter=E
X:\windows\system32\DR>format E: /q
- Example 4: Creating UEFI system volume and boot volume
- Select disks and convert to the GPT type.
X:\windows\system32\DR> diskpart
Display the existing disks.
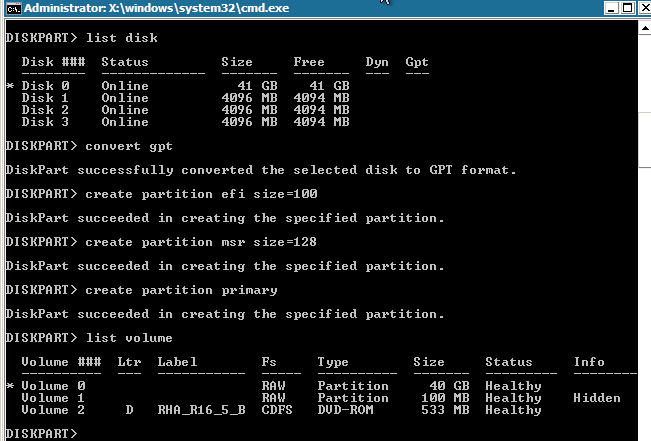
DISKPART>list disk
DISKPART>select disk 0
To create UEFI partition, disks must be converted to GPT type first.
DISKPART>convert gpt
- Create the UEFI System partition.
Create the UEFI partition.
DISKPART>create partition efi size=100
Create the MSR partition.
DISKPART> create partition msr size=128
Create the primary partition.
DISKPART> create partition primary
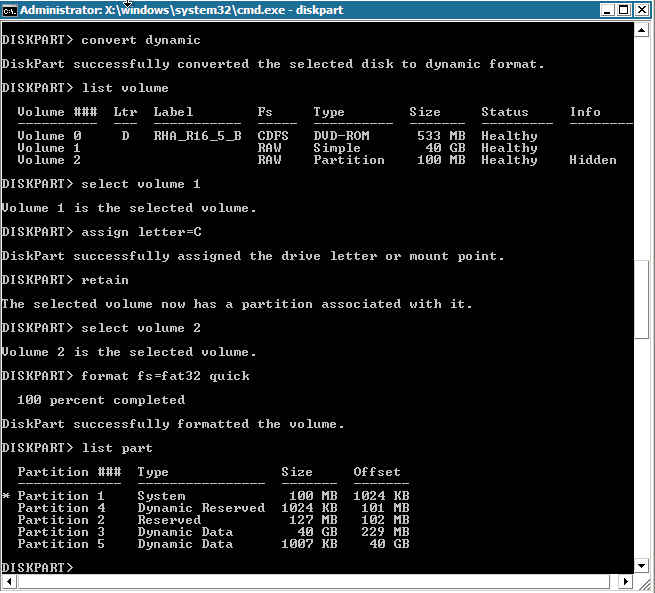
DISKPART>convert dynamic
DISKPART>list volume
- Retain the boot volume.
DISKPART>select volume 1
DISKPART>assign letter=C
DISKPART>retain
- (Optional) Format the system volume to FAT32.
Prepare volume 2 as system volume.
DISKPART>select volume 2
DISKPART>format fs=fat32 quick
DISKPART>list partition
Note: You only need to retain the boot volume. To restore data to the UEFI partition, the master server should be UEFI partitioned.
- Example 5: Creating Mirrored system volume and boot volume.
-
The following steps describe how to create mirrored disks on UEFI volume. For more information about mirrored disk on UEFI volume refer to Microsoft document at this link: http://support.microsoft.com/kb/951985
- Select disk 0 and create the primary UEFI boot/system volume.
DISKPART>list disk
DISKPART>select disk 0
DISKPART>convert gpt
DISKPART>create partition efi size=100
DISKPART> create partition msr size=128
DISKPART> create partition primary
DISKPART>convert dynamic
DISKPART>list volume
DISKPART>select volume 1
DISKPART>assign letter=C
- Select disk 4 as the secondary disk to create boot/system volume.
DISKPART>list disk
DISKPART>select disk 4
DISKPART>convert gpt
DISKPART>list partition
(Optional, delete existing partition) Select partition 1 on disk 4, and then delete it with the override command.
DISKPART> Select partition 1
DISKPART> Delete partition override
DISKPART>create partition efi size=100
DISKPART> create partition msr size=128
DISKPART>list partition
DISKPART>convert dynamic
- Establish a mirror from the boot volume to the secondary drive.
DISKPART>select volume C
DISKPART>add disk=4
DISKPART>retain
- (Optional) Format the system volume with FAT32.
DISKPART>list volume
DISKPART> select volume 1
DISKPART> format fs=fat32 quick
DISKPART> select volume 2
DISKPART> format fs=fat32 quick
Note: Establish mirror on the boot volume and retain this volume. You can only restore one Master UEFI system partition.
For more information about the DiskPart command, refer to Microsoft documentation.
| Copyright © 2014 Arcserve. All rights reserved. |
How To Create A Partition With Diskpart
Source: https://ftpdocs.broadcom.com/cadocs/0/CA%20ARCserve%20Replication%20and%20High%20Availability%20r16%205-ENU/Bookshelf_Files/HTML/VMS/2069258.html
Posted by: lightreand1997.blogspot.com
0 Response to "How To Create A Partition With Diskpart"
Post a Comment