

How To Create A Virtual Machine Using Hyper V
Z7_3054ICK0KGTE30AQO5O3KA30N0
hp-concentra-wrapper-portlet
![]() Actions
Actions
HP PCs - How to Enable and Use Client Hyper-V
This document pertains to all HP PCs with Windows 8 Professional.
This document describes the procedure for installing Client Hyper-V and creating a virtual machine (VM) in Microsoft Windows 8 Professional. Client Hyper-V brings the same computer virtualization technology to Windows 8 Professional that was previously available in Windows Server. A VM allows a computer (the physical host machine) to run other operating systems and programs within the main operating system. These additional operating systems run the same as any other program on the computer. Common reasons for deploying virtual machines are:
-
Platform independence: Programs designed for a specific operating system can be run on a different operating system.
-
Security: Because the VM does not have access to the host operating system, its programs cannot damage other files or applications on the physical host machine.
-
Testing: Programs can be run in a variety of environments to ensure compatibility.
note:Each operating system must be licensed separately according to its requirements.
Enabling Client Hyper-V
You must sign in as an administrator to perform these steps. When not signed in as an administrator, Windows features cannot be turned on or off. Client Hyper-V can be enabled using Windows Control Panel (recommended for most customers) or Windows PowerShell (useful for IT professionals).
Enabling Client Hyper-V with Windows Control Panel
To enable Client Hyper-V using Windows Control Panel, follow the steps below.
-
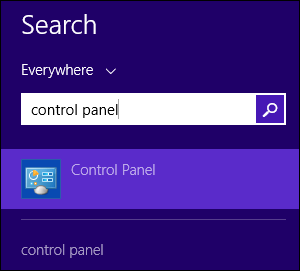
From the Start screen, type Control Panel to open the Search charm, and then select Control Panel from the search results.
Figure : Searching for Control Panel
-
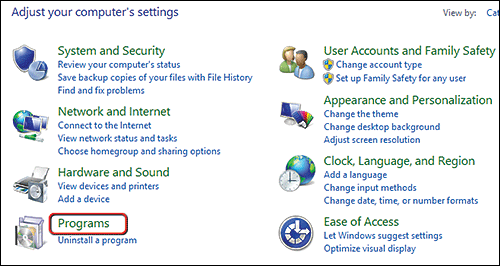
On the Control Panel, click Programs.
Figure : Windows Control Panel
-
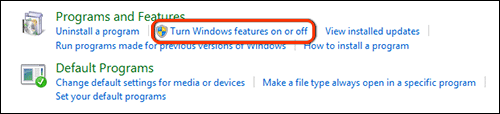
In the Programs and Features section, click Turn Windows features on or off.
Figure : Windows Control Panel Programs and Features
-
Click the plus (+) sign next to Hyper-V and all sub-items, click to place a check mark in the box next to Hyper-V and all sub-items, and then click OK.
note:
Ensure that all sub-items under Hyper-V are checked. If they are not, enable hardware virtualization support in the system BIOS. Refer to your system documentation for details.
Figure : Windows Features dialog box

Enabling Client Hyper-V with Windows PowerShell
Windows PowerShell is a command-line program similar to Command Prompt, and is designed especially for system administration. It helps IT professionals control and automate the administration of the Windows operating system and applications that run on Windows.
On the Windows PowerShell command line, type the following:
Enable-WindowsOptionalFeature FeatureName Microsoft-Hyper-V -All
Creating a Virtual Machine
Enabling Hyper-V installs Hyper-V Manager, a program used for creating and managing virtual machines. To create a new VM, follow the steps below.
-
From the Start screen, type Hyper-V Manager to open the Search charm, and then select Hyper-V Manager from the search results.
Figure : Searching for Hyper-V Manager

-
If you want your new VM to connect to a network, click Virtual Switch Manager from the Action menu. If you do not want your new VM to connect to a network, skip to Step 6.
Figure : Hyper-V Manager menu: Virtual Switch Manager

-
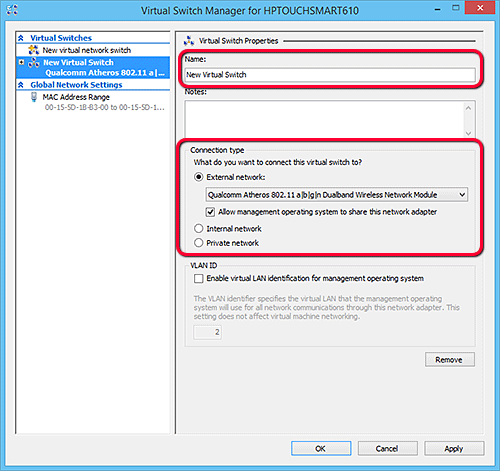
Click Create Virtual Switch, and then click OK.
Figure : Virtual Switch Manager

-
Create a Name for your virtual switch, and then select a Connection type.
Figure : Virtual Switch Properties
-
To apply networking changes, click OK.
Figure : Apply Networking Changes

-
From the Action menu, click New, and then click Virtual Machine.
Figure : Hyper-V Manager menu: New Virtual Machine

-
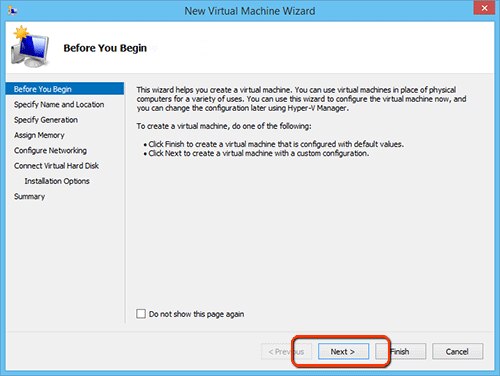
To create a VM with custom settings, click Next.
To create a VM with default settings, click Finish. The new VM is now created, and can be managed using the Hyper-V Manager.
note:
If you created a virtual switch, you must create your new VM using custom settings.
Figure : New Virtual Machine Wizard: Before You Begin
-
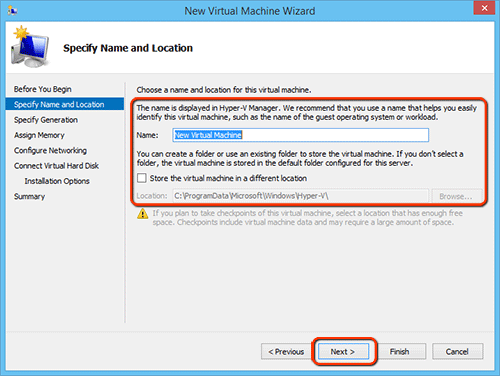
Create a name for the new virtual machine, select or create a folder for the new virtual machine (if desired), and then click Next.
Figure : New Virtual Machine Wizard: Specify Name and Location
-
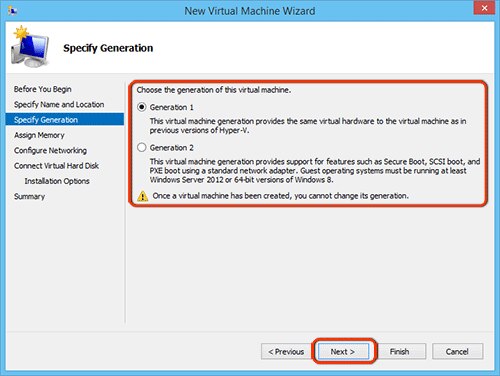
Specify the Generation, and then click Next. Select Generation 1 to provide the same virtual hardware to the virtual machine as in previous versions of Hyper-V. Select Generation 2 to provide support for the following:
-
Secure Boot, a feature that helps prevent unauthorized firmware, operating systems, or UEFI drivers from running at boot time.
-
SCSI boot, which allows the virtual machine to boot from a virtual hard disk or DVD that is attached to the SCSI controller.
-
Preboot Exection Environment (PXE) boot using a standard network adapter.
-
United Extensible Firmware Interface (UEFI), an alternative to the traditional BIOS system.
note:
Generation 2 can only be selected if the guest operating system will be Windows Server 2012, Windows Server 2012 R2, 64-bit versions of Windows 8, or 64-bit versions of Windows 8.1.
Figure : New Virtual Machine Wizard: Specify Generation
-
-
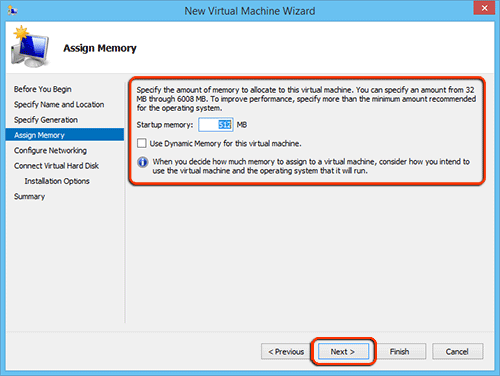
Assign memory, then click Next. Specify at least enough memory to run the guest operating system and all applications that you want to run simultaneously (refer to your operating system documentation for further details). The default amount is 512 MB, and this setting can be changed later if desired.
Figure : New Virtual Machine Wizard: Assign Memory
-
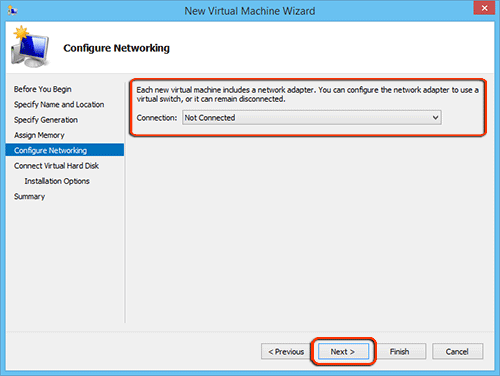
If you created a new virtual switch, select it from the Connection menu, and then click Next. If you did not create a new virtual switch, select Not Connected from the Connection menu, and then click Next.
Figure : New Virtual Machine Wizard: Configure Networking
-
Connect Virtual Hard Disk, and then click Next. You can either create a virtual hard disk, use an existing virtual hard disk, or add a virtual hard disk later.
Figure : New Virtual Machine Wizard: Connect Virtual Hard Disk

-
Configure Installation Options, and then click Next. You can choose to install an operating system later, install an operating system from a bootable CD/DVD-ROM, or install an operating system from a bootable floppy disk.
Figure : New Virtual Machine Wizard: Installation Options

-
Review settings, and then click Finish.
Figure : New Virtual Machine Wizard: Summary
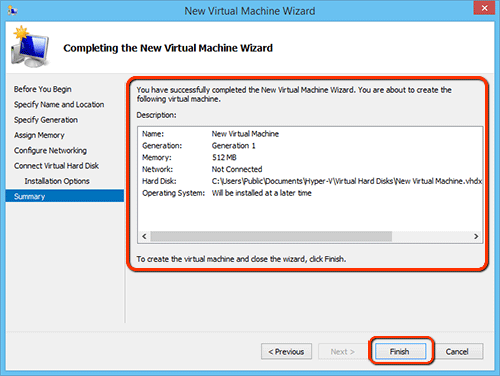
The new VM is now created, and can be managed using the Hyper-V Manager.
How To Create A Virtual Machine Using Hyper V
Source: https://support.hp.com/id-en/document/c04085252
Posted by: lightreand1997.blogspot.com
0 Response to "How To Create A Virtual Machine Using Hyper V"
Post a Comment